How harness fit checks work for children on ropes courses
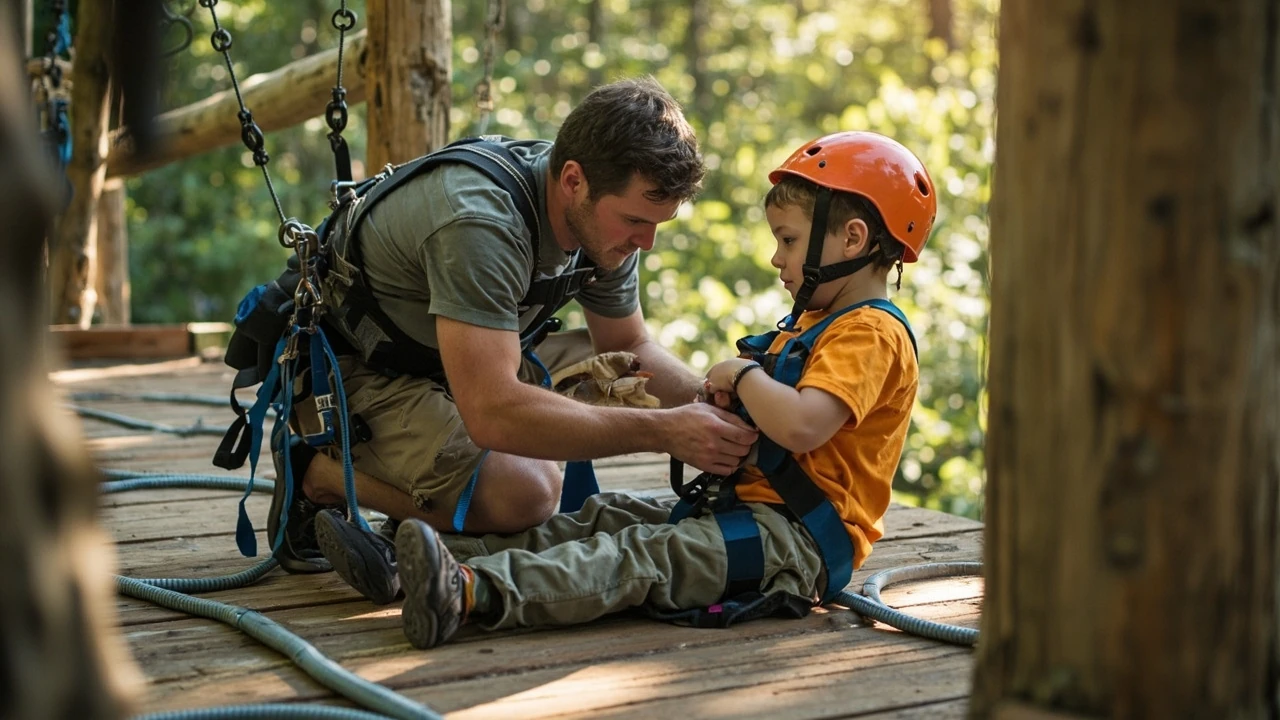
A harness that looks tight is not the same as a harness that fits. On a ropes course, the difference matters most for children, whose bodies change shape quickly, who understand the rules less completely than adults, and who are more likely to be inverted or caught off balance if something shifts mid-element. The harness fit check is the moment a trained staff member confirms, by hand, that the equipment will stay on the child no matter what happens higher up the course.
This guide explains how harness fit checks work for children on ropes courses. It covers the gear used, the steps an instructor follows in order, the small signs that signal a poor fit, and the things a parent can watch for before signing the safety waiver. It is written for families planning a first visit, not for staff training: the aim is to understand the process well enough to ask better questions and recognize good practice when you see it.
How harness fit checks work for children on ropes courses
A harness fit check is a short, structured inspection carried out by trained staff after a child is dressed in a sit harness and before they leave the briefing area. It exists because harness sizing is approximate: a single harness model usually covers a range of waist and thigh sizes, and a child can fall anywhere inside that range. The check confirms the specific unit on the specific child is adjusted to that child right now, not the previous wearer.
The process has three parts. Staff first select and adjust the harness, then physically test the fit by hand, then connect the child to the safety system and walk them to the start of the course. Each part has a failure mode that a casual observer would miss, which is why fit checks are always done by staff rather than by the child or the parent.
Why children need a separate approach
Children are not small adults. The same harness that fits an adult’s hips sits differently on a child’s narrower pelvis and shorter thigh, the torso length is shorter, and the center of mass sits higher relative to the harness geometry. Several practical consequences follow.
- Weight and height minimums exist partly to confirm the child is heavy enough to sit inside the harness rather than slip up through it during a fall.
- Children sweat more, which loosens webbing faster, especially on warm days.
- Clothing choices change between visits: a thin t-shirt in summer replaces a thick hoodie in winter, and harness adjustment must account for the difference.
- Children are less likely to notice that a buckle has slipped a notch during a long course, so the initial fit needs more margin.
Because of these factors, the fit check on a child is more thorough than the same check on an adult. Instructors assume the gear will move during the course and try to make that movement harmless.
What harness is used on a children’s ropes course
Most children’s courses use a sit harness, sometimes called a seat harness, which fastens around the waist and both thighs with webbing straps and metal buckles. The two common types are:
| Harness type | How it fastens | Typical use on a children’s course | Main limitation for kids |
|---|---|---|---|
| Standard sit harness with buckle waistbelt and buckled leg loops | Two or three buckles, manually adjusted | Most low and high ropes courses for children above the minimum weight | Requires careful leg-loop adjustment; leg loops can be forgotten |
| Full-body harness (chest harness joined to sit harness) | Combines sit harness with an upper body harness via a spreader bar or link | Used for very small or lighter children, and on zip lines | Heavier, hotter, and harder to fit quickly; not always available |
Operators choose between these based on the child’s weight, the height of the course, and the safety system in use. A course with a continuous belay cable, where the child cannot detach at any point, often accepts a sit harness alone. A zip line, where the rider hangs free at speed, usually needs a full-body harness so the torso cannot tip out of the seat.
How courses size children to a harness
Most operators do not measure children with a tape. Instead, they keep a small rack of harnesses in a few size ranges and test by feel. The typical progression is:
- Ask the child’s weight and age, which gives a starting size band.
- Pick the smallest harness in that band that closes comfortably, since webbing slack is easier to remove than to add.
- Have the child put arms up and do a small squat while staff watch how the harness moves.
- Adjust buckles until the fit passes the four-point hand test described below.
If no harness in the rack fits correctly, the child is not allowed on the course. This is not a failure of the system; it is the system working. A harness that almost fits is more dangerous than one that does not fit at all, because the family and the child have already invested in the visit and may push through the warning signs.
The four-point harness fit check staff perform
Instructors are taught a four-point check that takes roughly twenty to thirty seconds. It is repeated every time a new child is fitted, regardless of how many harnesses the staff member has adjusted that day. The four points correspond to the four places a sit harness can fail: waist, leg loops, buckle backs, and tie-in point.
1. Waist belt check
The instructor pulls the webbing tight around the child’s waist and confirms the belt sits above the hip bones, not across the soft stomach. A common error is to let the belt ride down to the narrowest part of the waist, which is below the pelvis on a child. After tightening, the instructor tries to slide a flat hand between the belt and the child’s body. One to two fingers of space is correct; a full fist is too loose.
Children sometimes suck in their stomachs during the check, which makes the fit look tighter than it really is. Good instructors ask the child to breathe normally, talk, or laugh before they take their hand away.
2. Leg loop check
Each leg loop is tested separately. The instructor pulls the webbing down at the inner thigh and tries to slide more than two fingers between the loop and the leg. If they can, the loop is too loose and must be tightened or the harness is the wrong size. Leg loops are the part most often missed on a casual fitting, because they feel less important than the waist belt to an untrained helper.
Loose leg loops have a specific failure pattern: during a fall, the child slides up through the harness so the waist belt rides up under the armpits, which is uncomfortable and can compress the ribcage. A well-adjusted leg loop prevents that slide.
3. Buckle back check
Every buckle on the harness has a tail of webbing that should pass through the buckle and double back on itself. The instructor checks that each tail is long enough to pass the buckle at least once and a few centimeters beyond. This sounds trivial, but a buckle whose tail is too short can slip under load if the webbing compresses, and a tail that is left dangling can catch on the cable or on a branch.
Where a buckle has a double-back configuration, the webbing must pass through the buckle twice. The instructor confirms this with their fingers rather than by eye, since worn webbing can be hard to read.
4. Tie-in point check
The tie-in point, the front loop where the lanyard or cow’s tail clips in, is pulled firmly downward to confirm it sits correctly relative to the child’s center of mass. On a sit harness, this loop should sit in front of the body, not to the side, and should hang low enough that the connecting lanyard pulls down on the pelvis rather than up on the chest.
The instructor also looks at the stitch line and any load-bearing carabiner. Any cut webbing, chemical staining, melted fibers, or bent hardware means the harness is removed from service immediately, even if the child has only just been fitted.
How the harness connects to the safety system
A correct harness fit does nothing on its own. The child also has to be connected to whatever catches them if they slip. On modern high ropes courses, this is usually a continuous belay system, where a metal runner or trolley runs along a steel cable from the start platform to the end platform and cannot be detached anywhere in between. The connection between harness and runner is the part the instructor checks last.
| Safety system | How the child is connected | What the fit check adds |
|---|---|---|
| Continuous belay (cable) | Trolley on a steel cable, linked to the tie-in point by a lanyard or two cow’s tails | Confirms lanyard length suits the child’s height and that both clips reach the trolley |
| Self-belay (clip-on, climb-on) | Two lanyards, each with a clip the child moves from cable to cable | Confirms the child can reach and operate the clips with the harness on |
| Static belay (instructor-held) | A rope tied to the tie-in point and held below by a second person | Confirms the tie-in knot and the belayer’s view of the child |
For children, the connection step matters as much as the harness step. A harness that fits but a lanyard that is too long leaves the child with excessive slack before the safety system catches them. A lanyard that is too short can pull the child off balance on a tilted element. Instructors set the lanyard length based on the child’s height and the element spacing, and recheck it on the first platform.
What staff look for in a child’s behavior during the check
Fit is not only about webbing tension. It is also about how the child wears the harness once they start moving. While doing the four-point check, a careful instructor watches for several behavioral cues that change the way the harness should sit.
- Whether the child is likely to wear a bulky layer on the course, which means a slightly looser fit on a cold day and a tighter fit on a warm day.
- Whether the child tends to lean forward or backward on elements, which affects how the tie-in loop should hang.
- Whether the child has long hair that needs to be tied up so it cannot catch in a buckle or in the trolley.
- Whether the child is wearing jewelry, drawstrings, or loose scarves that should come off before the course starts.
- Whether the child can hear and respond clearly, which determines whether they can be sent on a self-guided section or need a closer-supervised route.
These details rarely appear on a printed checklist, but they show up in how a good instructor fits the harness and explains the next step. A child who has been told why the long hair comes down or why the hoodie is zipped up has usually been fitted more carefully than one who has not.
What can go wrong during the fit check
Most fit problems on a children’s course are the result of small errors, not broken equipment. The common issues, roughly in order of how often they appear, are listed below.
| Problem | How it shows up | How the instructor corrects it |
|---|---|---|
| Leg loops too loose | Webbing gap visible at the inner thigh; harness slides up when the child squats | Tightens leg loops, or changes to a smaller harness |
| Waist belt rides up to the ribs | Belt sits across the soft stomach instead of above the hips | Re-seats the belt and tightens the buckle; if it slips back, changes harness size |
| Buckle tail too short | Webbing barely reaches the second bar of the buckle | Loosens the belt until the tail passes the buckle correctly, even if the fit is now slightly loose, then refits |
| Webbing twisted inside the buckle | Visible diagonal line where the strap exits the buckle frame | Unthreads the webbing and rethreads it flat |
| Twisted leg loop | One thigh strap sits higher than the other or crosses in front of the crotch | Removes the harness and refits from scratch |
| Child has grown since last visit | Belt closes at the last notch, leg loops at the tightest position | Refits in the next size up rather than running the strap to its limit |
Two of these deserve a special note. A twisted leg loop is a particular problem on courses where staff fit many children in a short window, because it can be set up correctly in the morning and end up twisted after several refits. A child who has grown since the last visit will often pass a quick check even when the harness is technically too small, because children learn to tighten themselves into a harness that does not quite fit.
How the fit is rechecked during the course
The platform fit check is not the last one of the day. Most operators run a second check at the first platform of the course, before the child has climbed high, and instructors on the course will recheck any child whose harness looks like it has shifted. There are a few reliable signals staff watch for from the ground.
- The waist belt has slipped up under the ribs, which is visible as a horizontal line across the torso above the navel.
- One leg loop has worked its way higher than the other, especially on a child who favors one leg on ladder elements.
- The buckle tail is flapping freely, which means the buckle is not double-backed or the webbing is too long for that buckle.
- The child is hanging back from a vertical element, which can mean the harness is pinching under the arms or the leg loops are too tight.
If any of these appears, the child is brought back to a platform where the harness can be re-fitted or replaced. This is a routine part of the day, not a failure on the child’s part, and a well-run course will tell children this when they are briefed so they do not feel singled out.
How a parent can watch a fit check from the ground
Parents are usually allowed to watch the briefing and the fit check from a short distance away. The point of watching is not to second-guess the instructor, but to know that the process has been done properly. A few useful things to look for.
- The child is wearing the right size harness. You can tell by the position of the waist belt: it should sit across the top of the hip bones, not below them.
- The instructor physically tests each leg loop by trying to slide fingers between the webbing and the leg, rather than only looking at it.
- Both buckle tails are tucked against the webbing. Loose tails are a sign of a quick fit.
- The lanyard or cow’s tail from the tie-in point reaches the trolley or the next clip without the child having to over-reach.
- The instructor talks the child through what they are doing. Children who understand the harness are less likely to fiddle with the buckles during the course.
If any of these steps is skipped, it is reasonable to ask the staff member, politely, to walk through the fit check again. A professional instructor will not be offended; an under-trained one usually is, and that reaction is itself useful information.
Frequently asked questions
How long does a children’s harness fit check take?
A trained instructor can complete a four-point fit check in about twenty to thirty seconds once the harness is on. The total fitting time, including picking the size, dressing the child, doing the check, and clipping in, usually runs from three to five minutes per child.
Can a parent fit a child’s harness instead of staff?
On every well-run course, no. The fit check is part of the safety system and is carried out by trained staff, with the harness owned and inspected by the operator. Parents are usually present but do not perform the check themselves.
What if my child is between two harness sizes?
Staff will normally pick the smaller of the two sizes and adjust carefully, since a slightly tight fit is safer than a slightly loose one. If the smaller size pinches the child or cannot be adjusted to pass the four-point test, the larger size is used and the child is monitored more closely on the course.
Why does the harness need to be above the hips?
A waist belt that sits on the soft stomach can ride up under the ribs during a fall and can also slide down under the hips if the child bends forward, which is exactly the position a child adopts when stepping off a platform. Above the hips, the belt cannot slide further in either direction.
Does the fit change during a long course?
Yes. Webbing settles, the child sweats, the child grows during a hot afternoon, and buckles can work loose from repeated movement. Most operators plan a recheck at the first or second platform of the course and again if the staff on the course notice any change in how the harness is sitting.
Is a full-body harness safer for a child?
Not always. A full-body harness is more protective when the child is hanging free, such as on a zip line, and when the child is small enough that a sit harness alone might not keep them upright. On a course with a continuous belay and a clear weight minimum, a properly fitted sit harness is the standard choice because it is cooler and easier to adjust.
What should a child not wear under the harness?
Avoid loose scarves, hoodies with long drawstrings, dangling belts, and chunky jewelry. Hair should be tied back. Layers are fine, but the harness must be fitted with the layers the child will actually wear on the course, not with what they took off five minutes earlier.
How do I know the harness itself is in good condition?
You usually cannot tell from the ground, and you do not need to. Operators are required to log inspections of every harness on a fixed schedule, and staff remove any harness with cut webbing, chemical staining, melted fibers, worn buckles, or a missing inspection tag. If a harness looks visibly damaged, ask staff before your child is fitted.
What if my child is scared of the harness check?
Tell staff before the fitting. Instructors are used to nervous children and will usually slow down, explain each strap, let the child touch the buckle, and involve them in the test. A child who has helped with the fit check is more confident on the course than one who has only had the harness put on them.
Do all courses use the same harness and safety system?
No. The harness model, the buckle type, the lanyard layout, and the safety system vary between operators and between age groups at the same operator. A fit check that looks different from one you saw on a different course is not necessarily a worse check. What matters is that all four points are tested by hand and the connection to the safety system is rechecked at the first platform.
A practical note for families
Fit checks exist because harnesses do not fit children automatically, and a well-run course spends a visible amount of time on them. If you arrive and see staff rushing the fitting, or if harnesses are left lying on benches with no staff member watching, that is more of a concern than any single strap being slightly off. A good fit check looks unhurried, deliberate, and a little repetitive, because the same four points get tested on every child, every time, in the same order.
For families planning a first visit, the rest of the ropes course day tends to go well when the harness step has gone well. The overview of ropes course types and safety systems is a useful next read, and the guide to family rope park day planning around age and height rules helps set expectations before you arrive.
Related reading
Explore High Ropes Adventure
Trip tools
Essential adventure planning guides
Use these practical guides to compare rope park activities, prepare for a first high ropes day, check a booking, choose suitable footwear and contact the editorial team. Each page links to the relevant live tools and current planning sections.
Latest articles
- How to find Morgan Jay tickets without overpaying
- How to find national parks near me: a practical local search guide
- Paylater travel: how buy now, pay later works for trip bookings
- Bagsmart Blast Travel Backpack: A Practical Review for Day Trips and Adventure Days
- How to choose an outdoor rocking chair that actually lasts
- Indiana travel advisory map: how to read it before a day trip
- How to plan an outdoor day around a concert stop: a cardi b tickets field guide
- Outdoor sectional sofas: a practical buyer’s guide for patio living
- How amusement parks actually work: rides, safety, and what to expect
- Beis Travel: What the Bag Brand Offers for Outdoor Days