What happens during a high ropes safety briefing: a step-by-step walkthrough
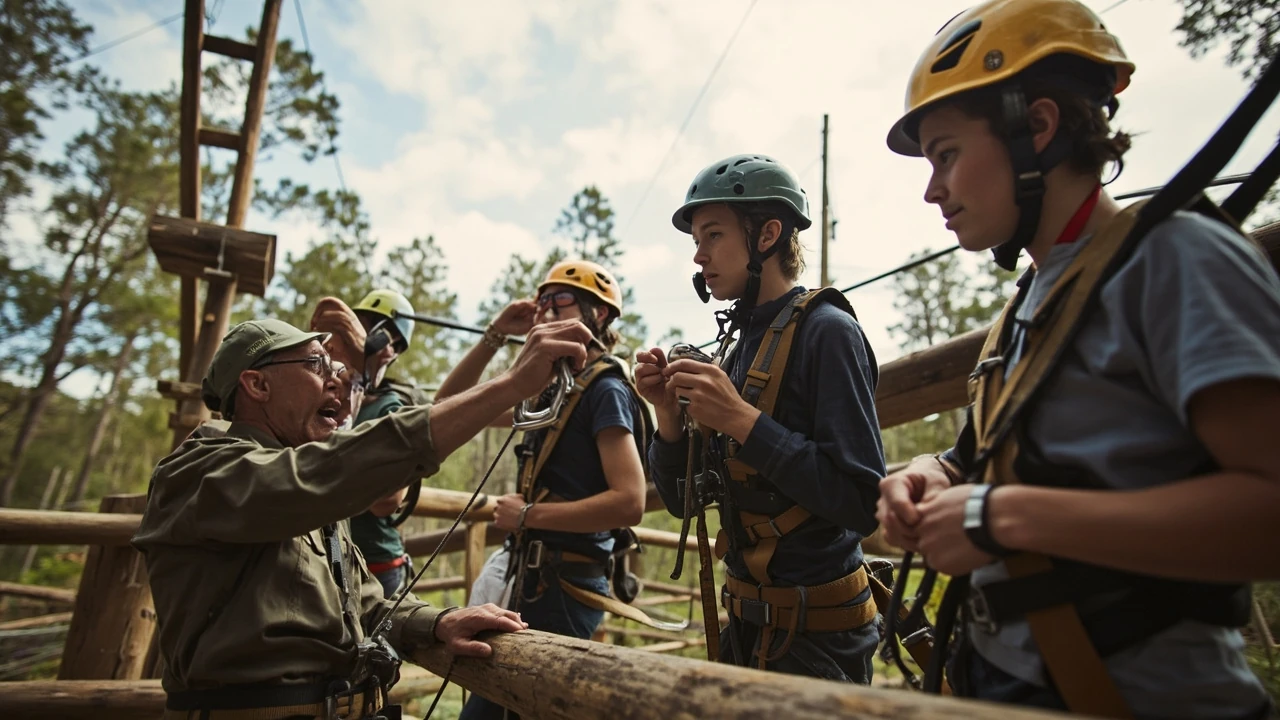
You arrive at the course, sign the waiver, and a staff member asks everyone to gather around a wooden demo platform. A second instructor hands you a helmet that smells like sunshine-warmed plastic and last summer’s bug spray. The next ten or fifteen minutes will decide how the rest of your day feels, because what happens during a high ropes safety briefing is the difference between a confident first climb and a confused shuffle on the first platform.
Most visitors treat the briefing as a formality, the part to get through before the “real” activity. In practice, the briefing is where a park teaches you its specific system, the harness you will wear, the clip style the course uses, the hand signals, and the small habits that prevent injuries. Parks differ enough in equipment and layout that a briefing you sat through at one operator does not automatically transfer to another.
This guide walks through the typical sequence a well-run park follows, from the moment you are called over to the moment you step onto the first element. It is written for first-time visitors, parents watching their kids, group leaders, and anyone who has booked a session and wants to arrive prepared rather than surprised.
What happens during a high ropes safety briefing at a high ropes course
The standard high ropes safety briefing has a clear shape, even when the words and the gear change. An instructor gathers the group in a shaded area near the practice course, introduces themselves and the support team, and then moves through the same five-part sequence every participant must follow: harness fit, helmet fit, system demonstration, hands-on practice, and a short rules recap before you leave the ground.
A good briefing takes roughly ten to twenty minutes for a family or small group and up to thirty minutes for a school or corporate group with mixed ages and experience. If a park rushes the briefing or skips the practice element, that is a signal to ask more questions before you climb.
Why the briefing exists beyond liability
It is easy to assume the briefing exists only to protect the operator from lawsuits. That is part of the picture, but it is not the main reason. The briefing exists because the equipment only works when it is used the way it was designed. A locking carabiner is meaningless if it is clipped to the wrong loop. A continuous belay system is genuinely safe only if every guest understands the order in which the two clips must move between elements.
Instructors also use the briefing to read the group. They are watching for very young children who may not have the arm reach for certain carabiners, for guests who are nervous and need extra patience on the practice course, and for participants whose clothing or footwear will cause problems twenty meters up. Catching those details on the ground is the entire point.
Who runs the briefing and what training they have
Briefings are typically led by a lead instructor, sometimes called a course manager or head guide, with one or more assistants circulating during the hands-on practice portion. Reputable parks employ staff trained in rope access, work-at-height rescue, and first aid. In North America, many operators follow standards published by groups such as the Association for Challenge Course Technology (ACCT), while European parks often work to EN 15567, the European standard for ropes courses.
You do not need to verify the staff’s résumé in the moment, but it is reasonable to ask which standard the course is built and inspected to. A confident answer is one sign you are in a serious operation.
Stage 1: harness fitting and adjustment
The briefing usually starts with the harness, because every later step depends on a correct fit. Most modern adventure parks use a sit harness that wraps the hips and upper thighs, with a chest harness added for younger participants or guests on courses with sustained upside-down elements. The instructor will hand you a harness by the rear tie-in point, ask you to step into the leg loops, pull it up to your waist, and then tighten the waist belt first, followed by each leg loop.
Expect the instructor to physically check your fit. They will often pull down on the waist belt to confirm it sits above the hip bones and does not slide over them, then tug each leg strap to make sure it is snug without cutting into the groin. A proper fit should feel tight at first and then become unnoticeable once you are moving. If something pinches on the ground, it will only get worse at height.
| Common fit issue | What the instructor checks | What you should feel or do |
|---|---|---|
| Waist belt riding up over the hips | Belt sits on the iliac crest, not the lower back | Tighten the rear buckle until the belt cannot be pulled down past the hip bones |
| Leg loops too loose | Two fingers of slack at most under the strap | Re-thread the strap through the buckle so excess webbing tucks away |
| Twisted webbing | Flat, untwisted strap across the front of each thigh | Step out and re-don the harness if a twist cannot be flattened by hand |
| Buckle not doubled back | Webbing passes through the buckle and doubles back at least 5 cm | Ask the instructor to confirm before leaving the practice area |
| Chest harness needed but not fitted | Younger or lighter participant on a course with inversions | Accept the chest harness even if it feels redundant; it keeps you upright if you hang |
A useful rule of thumb: if you can fit more than a flat hand between the webbing and your body, the harness is too loose. Instructors will tighten you further even when you think it is already snug, because a harness that slides an inch on the ground will slide several centimeters at height under repeated impact.
Stage 2: helmet fitting
Once the harness is on, the instructor moves to the helmet. Most parks use a climbing-style or skate-style helmet with adjustable straps and a chin strap. The fit check is the same one used in cycling and climbing: two fingers above the eyebrows, the side strap forming a Y around the ear, and the chin strap snug enough that you can feel it when you open your mouth.
Helmets at high ropes courses are not about preventing falls, since the belay system catches you before you hit anything. They are about the smaller knocks: a carabiner swung on a retrieval line, a branch at head height, a stray elbow on a crowded platform. Treat the helmet as standard equipment, not an optional extra.
- Adjust the rear dial or pads until the helmet does not shift when you shake your head.
- Confirm the chin strap sits under the chin, not across the throat.
- Tuck long hair inside the helmet so it does not catch on carabiners.
- Do not wear a hat under the helmet; it prevents a correct fit and the helmet will slide.
- Keep the chin strap buckled at all times once you leave the ground, even on transfer bridges and rest platforms.
Stage 3: the system demonstration
With harness and helmet fitted, the group gathers around a low demonstration cable or a sample carabiner. The instructor now explains the specific safety system the course uses. This is the part that varies the most between parks and the part you most need to actually listen to.
There are two broad families of system in common use.
| System type | How it works | What the briefing emphasizes |
|---|---|---|
| Self-belay with two carabiners (traditional) | Guests carry two locking carabiners and move them one at a time between anchor points on the cable | Order of clipping, when to lock, how to confirm a closed gate, what to do if a carabiner feels gritty |
| Continuous belay (smart belay, Saferoller, CT) | A trolley or rope follows the guest along the cable, requiring deliberate action to detach | Insertion at the start, the “double-action” detach, why you must not skip a station, emergency retrieval |
| Guided belay with staff on the ground | Staff manage ropes from below, especially on bigger climbs or via ferrata elements | Hand signals, when to call for a take-up, how to react if the belayer calls “Slack” |
| Static line with a single lanyard (easier courses) | One lanyard stays connected while a second is moved forward | Which lanyard moves, how to keep one hand free, the correct anchor point for your weight |
The instructor will usually name the system, show the carabiner or trolley up close, and demonstrate a full clip-in and clip-out at slow speed. A useful mental model is to watch which hand they move first, which hand second, and where their eyes go. That sequence is what you will copy on the course.
Common rules repeated at every park
Whatever the system, a few rules appear in nearly every briefing because they are universal.
- At least one attachment must be connected to the safety line at all times. The phrase you will hear most often is “always clipped” or “one clip on at all times.”
- Never hold a carabiner by the gate; grip the spine so an accidental push cannot open it.
- Lock every carabiner manually after clipping, then give it a visual check. The standard check is “click, look, good.”
- If something feels wrong, stop and call staff. There is no penalty for asking; there is a real risk in pushing through a sticky clip.
- Stay aware of the guest in front of and behind you on a single-track element so a sudden stop does not cause a collision.
Stage 4: hands-on practice on the demo course
Most parks include a low practice element, sometimes a horizontal ladder or a single cable, a foot or two off the ground. The instructor asks each participant to clip in, move across the element, and clip out on the other side while staff watch. This is where the briefing becomes real.
The practice step serves three purposes. It confirms you understood the system, it lets the instructor catch bad habits before you are six meters up, and it gives you a feel for how much hand strength is needed to operate the carabiners. Carabiners that feel light on the ground often feel heavy and wet by the third element, so the practice also calibrates your grip.
If you fumble the practice element, ask to do it again. No well-run park will move you to the main course until the staff member is satisfied, and a second run is far better than a rescue callout later.
What instructors watch during practice
Instructors are looking for specific behaviors, not just whether you made it across.
- Both carabiners engaged and locked at the start and end of the element.
- At least one carabiner connected to the safety line during the entire transition.
- Smooth, deliberate hand movements, not rushed or panicky clipping.
- Awareness of body position: no wrapping a lanyard around a hand or wrist, no sitting back hard into the harness while unclipped.
- Clear communication with the participant in front, including verbal “go ahead” or “on belay” calls where the course uses them.
Stage 5: course rules, signals, and emergency procedures
The final part of the briefing covers rules that apply once you are on the main course. The instructor will typically cover hand signals, weather procedures, the buddy system or spacing rules, and what happens if a guest freezes on an element.
Hand signals vary, but the most common are a raised open palm for “stop” or “hold,” a thumbs-up for “ready” or “all clear,” and two fingers pointed at the eyes to mean “check your clips.” Some parks use radios; others rely entirely on voice. The instructor will tell you which applies to your course.
Weather procedures are usually described briefly: lightning within a certain distance means everyone comes down, sustained high wind may close the upper course, and light rain is often fine but makes grips slippery. Ask which threshold the park uses if you have a weather-dependent member of your group.
What happens if someone freezes
It is more common than the marketing photos suggest. Roughly one in ten first-time participants stops moving at some point on a high element. Parks plan for this. The standard response is verbal coaching from the ground, often from a dedicated “rescue-ready” instructor who has a separate line and harness clipped in and ready to ascend if needed. If a guest cannot continue after several minutes of coaching, the staff will either lower them on a retrieval line or send a second instructor up alongside them.
Knowing this in advance matters because it changes how you think about being on the course. You are not on your own. There is a planned response for hesitation, panic, or a real equipment issue, and the briefing is the moment that plan is explained to you.
How long the briefing takes and why
For a family of four, plan on twenty to twenty-five minutes total from sign-in to stepping onto the first element, with the briefing itself taking around ten minutes. School and corporate groups run longer because instructors need to check more harnesses, manage larger practice rotations, and confirm group-specific rules. A course with a continuous belay system often has a slightly shorter briefing than a traditional two-carabiner course because the clipping sequence is more constrained.
If a park quotes a session length of, say, two hours, that typically includes ten to fifteen minutes of briefing, ten minutes of practice, and the remaining time on the course itself. Some parks offer a “quick jump” option for experienced climbers who have completed a full briefing within the last twelve months; the rest of us should plan to sit through the whole thing.
How to arrive prepared so the briefing is shorter and easier
You cannot skip the briefing, but you can make it faster and more comfortable by showing up ready for it. A small amount of preparation turns the safety talk from a firehose of new information into a confirmation of things you already half know.
- Wear closed-toe shoes with laces or straps. Sandals, Crocs, and slip-ons will be sent away for rentals or refused outright.
- Dress for the weather in layers you can remove at the base. Once you are on the course, you cannot take off a jacket and hand it to anyone.
- Tie back long hair and remove dangling jewelry, scarves, or loose hood strings before you reach the harness area.
- Bring any prescription medication you might need in a small belt bag, since you cannot easily reach a backpack once you are clipped in.
- Eat a light snack an hour or so before. A full stomach is uncomfortable in a harness, and an empty one can make you lightheaded at height.
- Read the operator’s pre-arrival email. Many parks list exactly what to expect, which removes the surprise factor from the briefing.
None of this is technically required, but each item reduces the small frictions that add up to a longer, more confused safety talk. Operators notice when guests are prepared, and a good instructor will spend more time on the practice element with a group that is already dressed for climbing.
What the instructor will ask you to do on the ground
During the briefing, the instructor is not just talking. They will ask you to perform specific actions so the learning is physical, not theoretical. Expect to be asked to:
- Pick up a carabiner and show which part is the gate and which is the spine.
- Open and close the locking mechanism until the instructor is satisfied you can do it with cold or wet hands.
- Clip into a sample cable and pull the carabiner to confirm it cannot slide off.
- Perform the “clip and lock” sequence three times in a row without looking at your hands.
- Signal a stop, a ready, and a check to a partner using the agreed hand signs.
If the instructor skips any of these, it is worth asking for them. The habits built in these few minutes are the same habits that keep you safe on element twelve of a fifteen-element course.
What a high-quality briefing feels like
It is worth knowing what a well-run briefing looks and sounds like, because not every park runs the same standard. The following list describes the kind of briefing you can trust.
- One instructor speaks at a time, using a microphone or a calm projected voice so the whole group hears the same words.
- Demonstrations are done at a pace that is slow enough to follow but not so slow that experienced participants disengage.
- Every participant gets a hands-on practice attempt, not just a verbal “do you understand.”
- The instructor names the standard the course is built to and the inspection body, when asked.
- There is a clear signal to ask questions, and at least one question per group is taken seriously.
- Staff walk the group to the practice course, not just point at it from a distance.
- The instructor explains how to summon help from the course, whether that is a radio, a whistle, or a hand signal.
Red flags include a briefing that lasts under five minutes, no practice element, instructors who joke through the safety content, or staff who fit harnesses loosely because the guest is in a hurry. None of these are dealbreakers on their own, but together they suggest an operation that treats safety as a checkbox rather than a process.
Frequently asked questions
Do I have to attend the high ropes safety briefing even if I have done a high ropes course before?
Yes. The briefing covers the specific system and course layout of the park you are visiting, which may differ from any other course you have used. Most parks do not accept prior briefings as a substitute. The good news is that with prior experience, the briefing is usually shorter and the practice element goes quickly.
Can parents or guardians skip the briefing if only their children are climbing?
In most cases, the supervising adult must be present for the briefing and stay on site while children climb, even if the adult is not climbing. The park needs a responsible adult to sign the waiver, listen to the emergency procedures, and be available if a child needs to come off the course. Some operators allow parents to sign a waiver and then watch from a viewing deck while a guide supervises the children directly.
What if I do not understand a part of the briefing because of a language barrier?
Ask for a second demonstration or for a staff member who speaks your language. Many parks serving international visitors have multilingual instructors, and a serious operation will pause the briefing to make sure every participant understands the system before moving on. Do not guess or nod along if you are unsure; the practice element exists precisely to clear up this kind of confusion.
Are photos and videos allowed during the briefing?
Most parks allow phones in the base area but ask that they be secured in a zip pocket or left with a non-climbing companion before clipping in. Some operators prohibit filming during the briefing itself so that guests focus on the demonstration. There is often a photographer on the course who sells prints at the end of the session, which removes the temptation to film while climbing.
What happens if it starts raining during the briefing?
Parks handle this in one of two ways. Some move the briefing under a covered area and continue normally, with grip and surface conditions explained as part of the talk. Others pause the briefing and either wait for the rain to pass or reschedule. Lightning typically halts everything, including the briefing, until the storm has moved a safe distance away. Ask the front desk what the policy is if the forecast is uncertain.
Is the briefing the same for children and adults?
The core content is the same, but the language and pace are adjusted. Instructors use simpler words, smaller practice elements, and more repetition for younger children. Adult-only groups may move through the briefing faster because the participants can follow multi-step instructions without as much demonstration. Group leaders should tell the operator in advance if there is a wide age range, so the briefing can be paced appropriately.
Can I leave the briefing partway through and rejoin later?
Usually not. The briefing is treated as a single unit because every later step depends on the earlier ones. If you arrive late, the park will normally ask you to wait for the next available briefing slot. Some operators will run a short catch-up briefing for late arrivals, covering the parts they missed and confirming competency on the practice element before letting them join the main course.
What should I do if I feel unwell during the briefing?
Tell the instructor immediately. A number of conditions, from a sprained ankle to severe dizziness, are reasons to step out of the briefing and reschedule. Parks would much rather rebook you than push you onto a course when something is wrong, and most operators offer flexible rebooking for genuine medical reasons. Trying to push through nausea, shoulder pain, or a panic response is not a sign of toughness; it is a risk to you and to the staff who may have to assist you at height.
Will the briefing cover what to do if it gets too high for me?
Yes, and this is one of the most valuable parts of the talk. Instructors will explain how to ask for help, how staff will respond, and how a guest who freezes is brought down safely. The standard procedure is verbal coaching first, then a staff-assisted descent, and only as a last resort a full technical rescue. Knowing this in advance often prevents the freeze from happening at all.
Is the briefing ever recorded or available to review online?
A small number of larger operators publish a short safety video on their site, often as a pre-arrival email link. The in-person briefing is still required, but a video can help you arrive familiar with the system. If the park you are visiting offers one, watch it the day before so the on-site briefing acts as a refresher rather than your first exposure to the equipment.
A final practical note before you go
The single most useful thing you can do is treat the briefing as part of the activity, not a delay before it. Show up ten minutes early, stand where you can see the demonstration, and run through the clip-and-lock sequence mentally while the instructor speaks. By the time you step onto the first real element, the motions should feel familiar, the harness should feel snug, and the system should make sense. That is the entire point of what happens during a high ropes safety briefing: it hands you the skills, the habits, and the confidence to enjoy the rest of the course without a single moment of doubt about the gear that is keeping you safe.
Related reading
Explore High Ropes Adventure
Trip tools
Essential adventure planning guides
Use these practical guides to compare rope park activities, prepare for a first high ropes day, check a booking, choose suitable footwear and contact the editorial team. Each page links to the relevant live tools and current planning sections.
Latest articles
- Tame Impala tickets: how to find them, what they cost, and what to know before you buy
- Outdoor pillows: how to choose the right ones for a deck or trail rest stop
- How to find Morgan Jay tickets without overpaying
- How to find national parks near me: a practical local search guide
- Paylater travel: how buy now, pay later works for trip bookings
- Bagsmart Blast Travel Backpack: A Practical Review for Day Trips and Adventure Days
- How to choose an outdoor rocking chair that actually lasts
- Indiana travel advisory map: how to read it before a day trip
- How to plan an outdoor day around a concert stop: a cardi b tickets field guide
- Outdoor sectional sofas: a practical buyer’s guide for patio living